Friday, June 4, 2010

DIY Antique Chalkboard

The concept of DIY chalkboards is nothing new in the Blog 'burbs, especially with the assortment of chalkboard paints that are now available.  What's so great about them is the crafty ways bloggers use things they already have around the house and turn them into practical yet decorative pieces of art.  My own version is not all that crafty, but I did use something I already had - a large ornate antique picture frame.


This isn't the exact one I used for my project, but it's about the same size and I wanted to give you an idea of what to use.  You can usually find lots of these at flea markets or yard sales for a reasonable price.

I found one that was just the size I was looking for and also had a presence all on its own.  Additionally, it blended with the rest of the decor around my home.

I then looked around for something to use as a backing, since I didn't want to spend any money for this project.

I came up with this picture that used to hang in our basement/man cave.


Very manly.

But with a woman's touch, that turned into this:


I used some chalkboard spray paint I had and then ran the surface of the long side of a piece of chalk along the entire surface to "season" the chalkboard.  You wipe it off with a paper towel and you're ready to go.

I used this great chalk marker that I found on another blog (forgive me for not remembering who you are!) to add a recipe.
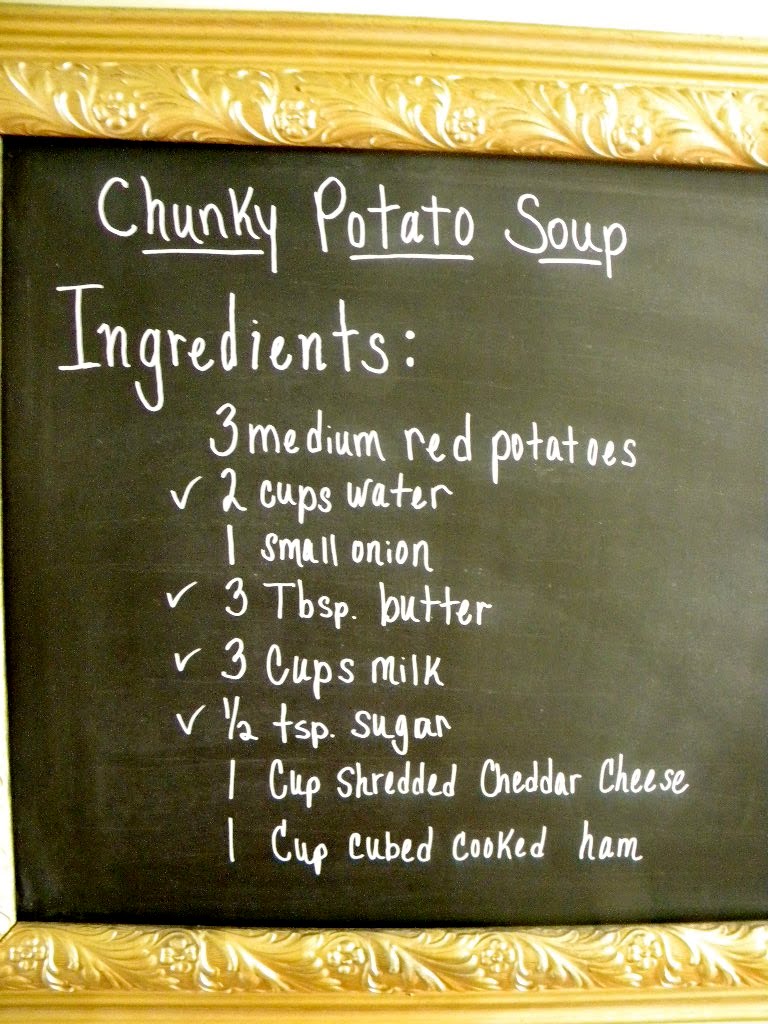


I found these at A.C. Moore and they are wonderful for giving a neat and clean finish to your board, and they wipe off like regular chalk.


Another great tip for hanging anything heavy are these gorilla hooks.  I found mine at Bed, Bath & Beyond, but you can get them anywhere.


They really do work!

Here's another view of where I hung my chalkboard.


It's a small hallway leading from the kitchen to the formal Dining Room, which is why I wanted it to look a little more formal.  It's also directly across from my pantry, which makes it convenient to write down things I need to pick up at the grocery store.


A close-up look at the detail.

Overall this was a simple project.  I'm linking up to the following parties.

Home and Family Friday at Home is Where My Story Begins
Show and Tell Friday at My Romantic Home
Plant A Punkin Seed Party at Punkin Seed Creations
Creative Cats Party at Poppies at Play
Inspired By Friday at The Inspired Room

A special thanks to the hostesses of all of these great parties.  Be sure to check them out for other inspiring projects.

xoxo,
Kim

Tuesday, June 1, 2010

Christmas in June


Remember that feeling you used to get as a child on Christmas Eve?  You'd be so excited that you could hardly get to sleep?  That's the feeling I get every Friday night during yard sale season.  I'm usually wide awake by 3 or 4:00 a.m.

Remember how you couldn't wait to open that first present but your parents made you wait until everybody was seated around the Christmas Tree?  That's how I get on my way to the first yard sale of the day.  I'm always the first one there, waiting until things are set up.

Remember how you were so excited that you started tearing through presents and didn't even stop to play with something before you were on to the next present?  That's me too.  I waste no time browsing, selecting and paying, and then I'm off to the next sale.

Remember when you were done opening all of your presents and you were disappointed at how quickly you blew through them?  Uh-huh.  I wait all week for the thrill of the hunt and then just like that, it's over.

Remember Christmas night when you went through your pile and started playing with your new toys, one by one, realizing that you don't even remember opening them?

Only now, I don't have to wait a whole 365 days until the next hunt.  But some weeks, it sure feels like it.

This weekend, being a holiday weekend, there were not a lot of yard sales to be found.  We went to a couple, but for the most part it was a bust.  For the first time I even left a church sale empty handed.
Not a good sign.  I did walk away with a free terra cotta planter.

I bought this awesome book for $2.


I checked out this planter at the same sale and the seller told me I could just take it with me.

All because of this.


No problem, I'll just turn it around!


 Voila!

So it was on to the local flea market where we were much more successful.

I found this little sign for only $3 and it looks perfect in my kitchen.

Hmmm, don't think that's how you spell "Bistro", but who really cares?  Ha!  Maybe they spell it that way in France?

This adorable ceramic bunny serving piece was just $3.50.


So French Country, oui?

I showed these nesting table in a previous post.  I've seen these Florentine Tole nesting tables before, but it's rare to find a complete set.  I have one next to my desk that holds my printer, but it's the smallest one and it's resin.  This set is papier mache tole.  Most of the sets I've seen are resin.  Either way, I love them and I was thrilled to get this set for just $25.  It's very weathered and worn, which makes even beta to me!


I originally purchased them for my Etsy store, but they look so perfect in my Dining Room between my two windows (sorry Denise, I'll make it up to you I promise, and I owe ya fifteen bucks).


These next items are definitely going in the store, and they are all tole pieces, my favorite!

A silent butler with beautiful colors.


A floral tole tray - perfect condition.


And 2 identical florentine tole trays in a rust color.


So all in all, not a bad haul.  And only 3 days and 12 hours to go until the next hunt......

Today I'm linking up to the following parties:

Thrifty Thursday at Tales From Bloggeritaville
Nifty Thrifty Tuesday at Coastal Charm
Twice Owned Tuesday at Creating a House of Grace
Frugal Friday at The Shabby Nest
Frugalicious Friday at Decor Momma
Garage Salen' Sunday at Debbie Doos!  (sorry my sweet friend!)

Thanks to these gracious women for hosting every week.  Be sure to check them out for more great thrifty finds!

xoxo,
Kim

A Home For My Table


Many, many thanks for all of your wonderful suggestions on what to do with my new/old table and mirror.  I had asked you if I should paint it, or keep it the way it is. After considering all of my options, I finally found the perfect spot and kept the original wood finish.  It just needed some Old English to restore her to her natural state of beauty.


Before I had this smaller table from Bombay Co. in this spot.


It worked, but I think it was just a little to small.

I like this much better.


It's in my foyer and can be seen from the kitchen, upstairs and living room.  A table like this deserves to be seen, don't you think?


In the end, I did not use the mirror.  As pretty as it was, I'm just not the matchy-matchy type.  So I will have to find another use for it, or sell it I guess.

Thanks again for all of your help!  Have a wonderful week.
xoxo,
Kim